يتطور مجال الروبوتات والذكاء الاصطناعي والتعلم الآلي بسرعة بحيث من المؤكد أنه سيغير نمط حياة البشرية في المستقبل القريب. يُعتقد أن الروبوتات تفهم العالم الحقيقي وتتفاعل معه من خلال أجهزة الاستشعار ومعالجة التعلم الآلي. يعد التعرف على الصور إحدى الطرق الشائعة التي يُعتقد أن الروبوتات تفهم بها الأشياء من خلال النظر إلى العالم الحقيقي من خلال الكاميرا تمامًا كما نفعل نحن. في هذا المشروع ، دعنا نستخدم قوة Raspberry Pi لبناء روبوت يمكنه تتبع الكرة ومتابعتها تمامًا مثل الروبوتات التي تلعب كرة القدم.
الأجهزة المطلوبة:
إعداد المعالجة على Raspberry Pi:
الخطوة 1: - قم بتوصيل Raspberry Pi بالشاشة ولوحة المفاتيح والماوس وتشغيلها.
الخطوة 2: - تأكد من أن Pi متصل باتصال إنترنت نشط لأننا على وشك تنزيل بعض الأشياء.
الخطوة 3: قم بتنزيل IDE الخاص بمعالجة Raspberry Pi.
الخطوة 4: - بمجرد التنزيل ، قم باستخراج الملفات الموجودة في مجلد ZIP في الدليل المفضل لديك. لقد استخرجته للتو على سطح المكتب الخاص بي.
الخطوة 5: - الآن ، افتح المجلد المستخرج وانقر على الملف المسمى المعالجة. يجب أن تفتح نافذة كما هو موضح أدناه.
الخطوة 6: - هذه هي البيئة التي سنكتب فيها أكوادنا. بالنسبة للأشخاص الذين هم على دراية بـ Arduino ، لا تصدموا ، نعم ، يبدو IDE مشابهًا لـ Arduino وكذلك البرنامج.
الخطوة 7: - نحتاج إلى مكتبتين حتى يعمل برنامج الكرة التالي ، للتثبيت ثم انقر فقط على Sketch -> Import Library -> Add Library. سيتم فتح مربع الحوار التالي.
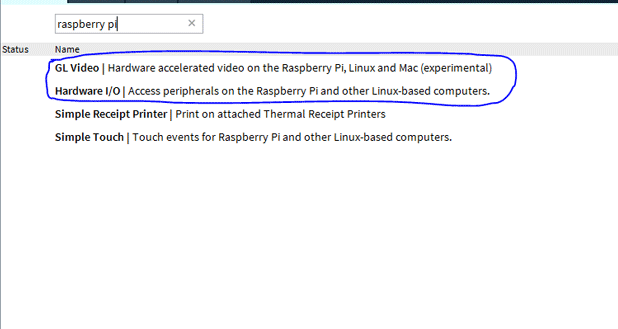
الخطوة 8: - استخدم مربع النص العلوي الأيسر للبحث عن Raspberry Pi واضغط على Enter ، يجب أن تبدو نتيجة البحث مثل هذا.
الخطوة 9: - ابحث عن المكتبات المسماة "GL Video" و "Hardware I / O" وانقر فوق install لتثبيتها. تأكد من تثبيت كلتا المكتبتين.
الخطوة 10: - بناءً على الإنترنت الخاص بك ، سيستغرق التثبيت بضع دقائق. بمجرد الانتهاء ، نكون جاهزين لمعالجة البرامج.
مخطط الرسم البياني:
يظهر الرسم التخطيطي لمشروع تتبع كرة Raspberry Pi أدناه.
كود المشروع:
//tech-hme.com

import processing.io.*;
import gohai.glvideo.*;
GLCapture video;

color trackColor;

void setup() {
  size(320, 240, P2D);

  video = new GLCapture(this);

  video.start();

  trackColor = color(255, 0, 0);

  GPIO.pinMode(4, GPIO.OUTPUT);
  GPIO.pinMode(14, GPIO.OUTPUT);
  GPIO.pinMode(17, GPIO.OUTPUT);
  GPIO.pinMode(18, GPIO.OUTPUT);
}

void draw() {
   background(0);
  if (video.available()) {
    video.read();
  }

  video.loadPixels();
  image(video, 0, 0);

  float worldRecord = 500;
  int closestX = 0;
  int closestY = 0;

  // Begin loop to walk through every pixel
  for (int x = 0; x < video.width; x ++ ) {
    for (int y = 0; y < video.height; y ++ ) {
      int loc = x + y*video.width;
      // What is current color
      color currentColor = video.pixels[loc];
      float r1 = red(currentColor);
      float g1 = green(currentColor);
      float b1 = blue(currentColor);
      float r2 = red(trackColor);
      float g2 = green(trackColor);
      float b2 = blue(trackColor);

      // Using euclidean distance to compare colors
      float d = dist(r1, g1, b1, r2, g2, b2); // We are using the dist( ) function to compare the current color with the color we are tracking.

      // If current color is more similar to tracked color than
      // closest color, save current location and current difference
      if (d < worldRecord) {
        worldRecord = d;
        closestX = x;
        closestY = y;
      }
    }
  }

  if (worldRecord < 10) {
    // Draw a circle at the tracked pixel
    fill(trackColor);
    strokeWeight(4.0);
    stroke(0);
    ellipse(closestX, closestY, 16, 16);
    println(closestX,closestY);

    if (closestX<140)
    {
     GPIO.digitalWrite(4, GPIO.HIGH);
     GPIO.digitalWrite(14, GPIO.HIGH);
     GPIO.digitalWrite(17, GPIO.HIGH);
     GPIO.digitalWrite(18, GPIO.LOW);
     delay(10);
     GPIO.digitalWrite(4, GPIO.HIGH);
     GPIO.digitalWrite(14, GPIO.HIGH);
     GPIO.digitalWrite(17, GPIO.HIGH);
     GPIO.digitalWrite(18, GPIO.HIGH);

     println("Turn Right");
    }
    else if (closestX>200)
    {
     GPIO.digitalWrite(4, GPIO.HIGH);
     GPIO.digitalWrite(14, GPIO.LOW);
     GPIO.digitalWrite(17, GPIO.HIGH);
     GPIO.digitalWrite(18, GPIO.HIGH);
     delay(10);
     GPIO.digitalWrite(4, GPIO.HIGH);
     GPIO.digitalWrite(14, GPIO.HIGH);
     GPIO.digitalWrite(17, GPIO.HIGH);
     GPIO.digitalWrite(18, GPIO.HIGH);
     println("Turn Left");
    }
    else if (closestY<170)
    {
     GPIO.digitalWrite(4, GPIO.HIGH);
     GPIO.digitalWrite(14, GPIO.LOW);
     GPIO.digitalWrite(17, GPIO.HIGH);
     GPIO.digitalWrite(18, GPIO.LOW);
     delay(10);
     GPIO.digitalWrite(4, GPIO.HIGH);
     GPIO.digitalWrite(14, GPIO.HIGH);
     GPIO.digitalWrite(17, GPIO.HIGH);
     GPIO.digitalWrite(18, GPIO.HIGH);
     println("Go Frwd");
    }
    else
     {
     GPIO.digitalWrite(4, GPIO.HIGH);
     GPIO.digitalWrite(14, GPIO.HIGH);
     GPIO.digitalWrite(17, GPIO.HIGH);
     GPIO.digitalWrite(18, GPIO.HIGH);
     }
  }
  else
  {
     GPIO.digitalWrite(4, GPIO.HIGH);
     GPIO.digitalWrite(14, GPIO.HIGH);
     GPIO.digitalWrite(17, GPIO.HIGH);
     GPIO.digitalWrite(18, GPIO.HIGH);
  }
}

void mousePressed() {
  // Save color where the mouse is clicked in trackColor variable
  int loc = mouseX + mouseY*video.width;
  trackColor = video.pixels[loc];
}


 الخطوة 8: - استخدم مربع النص العلوي الأيسر للبحث عن Raspberry Pi واضغط على Enter ، يجب أن تبدو نتيجة البحث مثل هذا.
 الخطوة 9: - ابحث عن المكتبات المسماة "GL Video" و "Hardware I / O" وانقر فوق install لتثبيتها. تأكد من تثبيت كلتا المكتبتين.